Sony Vegas Pro 8 makes it easier to edit videos from different cameras right from the timeline. You can capture and edit video for a single scene from 2 or more cameras or for a single scene shot a few times with one camera.
Here is a tutorial of a Multicamera Edit of a drama I shot. The drama was acted out four times to the public and being a non-profit organization, the client have budget only for one videographer. For each of the 4 acts, the camcorder (Sony HDR-FX7 High Definition Camcorder) was placed at 4 different positions and shot in various angles.
Multicamera edit is accomplished in only 8 steps with the Sony Vegas Pro 8.
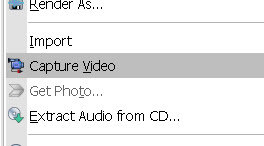
Step #1: Capture Multicamera Video Clips
Use the normal Sony Vegas Video Capture function to capture recordings from each camera. Give each capture filename a unique name. Enable scene detection before capturing so that each segment is captured as a separate clip.
Step #2 : Layout Video Clips on Timeline
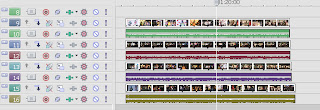
Drag and drop video clips over each other on the timeline.
Step #3 : Synchronize Multiple Video Clips
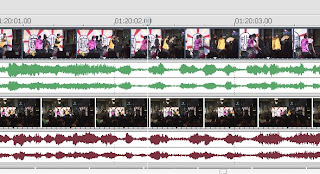
Synchronize the video clips using the audio waveform as reference. Identify obvious peaks and valleys patterns. Drag the clips till they align over each other. Play and listen to ensure audio is synchronized.
 Step #4 : Select Tracks for Multicamera Edit
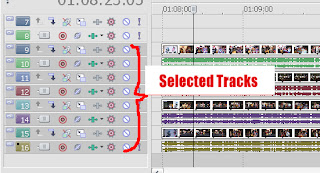
Select the tracks that the video clips are laid on. Press and hold the CONTROL key while clicking on the track numbers on the left.
Step #5 : Create Multicamera Track
From the Tools menu, select Multicamera, and click "Create Multicamera Track".
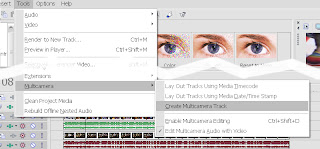
Vegas Pro 8 combines the the 4 tracks into 1 Multicamera track.

Step #6 : Enable Multicamera Edit
From the Tools menu, select Multicamera, and click "Enable Multicamera Editing". Also select "Edit Multicamera Audio with Video".
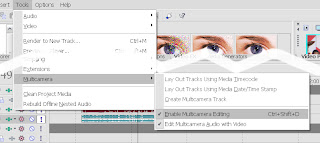
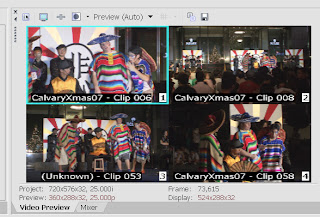
In Multicamera editing mode, the Video Preview window switches into multi-screen mode. Each screen is called a "Take". The active take is enclosed with a coloured border.
Step #7 : Edit Video by Choosing Takes
Play the video on the timeline. Watch all the small screens in action in the Video Preview Window. Look out for a good take. Choose the good take by clicking on it. When you choose a take, Vegas Pro automatically cuts the video clip.
Step #8 : Turn Off Multicamera Edit and Fine Tune
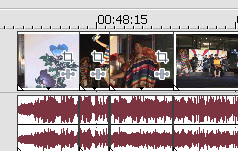
When you have completed your multicamera editing, turn off multicamera editing mode. Select Tools > Multicamera > Uncheck "Enable Multicamera Editing".

When multicamera mode is off, the Video Preview Window goes back to one clip. The video tracks remain as one track with the segments neatly cut and joint. Now continue to edit the finer points using the traditional Sony Vegas Video Editing features.
Step #9 : Always Remember to SAVE Your Work

At first the Multicamera edit process seems tedious, but with practice, everthing is easy. I would say the Multicamera Edit feature proves to be the best upgrade since Sony Vegas 4.
Thanks for watching! :)
Adrian Lee
http://videolane.com/
http://videolane.blip.tv/
http://instantviralvideo.com/
http://adriansjournal.blogspot.com/
PS:
Is this tutorial helpful? Do you need to know more?
Please leave a comment or question.
PPS:
Here is a tutorial of a Multicamera Edit of a drama I shot. The drama was acted out four times to the public and being a non-profit organization, the client have budget only for one videographer. For each of the 4 acts, the camcorder (Sony HDR-FX7 High Definition Camcorder) was placed at 4 different positions and shot in various angles.
Multicamera edit is accomplished in only 8 steps with the Sony Vegas Pro 8.
Step #1: Capture Multicamera Video Clips
Use the normal Sony Vegas Video Capture function to capture recordings from each camera. Give each capture filename a unique name. Enable scene detection before capturing so that each segment is captured as a separate clip.

Step #2 : Layout Video Clips on Timeline
Drag and drop video clips over each other on the timeline.

Step #3 : Synchronize Multiple Video Clips
Synchronize the video clips using the audio waveform as reference. Identify obvious peaks and valleys patterns. Drag the clips till they align over each other. Play and listen to ensure audio is synchronized.
 Step #4 : Select Tracks for Multicamera Edit
Select the tracks that the video clips are laid on. Press and hold the CONTROL key while clicking on the track numbers on the left.

Step #5 : Create Multicamera Track
From the Tools menu, select Multicamera, and click "Create Multicamera Track".

Vegas Pro 8 combines the the 4 tracks into 1 Multicamera track.

Step #6 : Enable Multicamera Edit
From the Tools menu, select Multicamera, and click "Enable Multicamera Editing". Also select "Edit Multicamera Audio with Video".

In Multicamera editing mode, the Video Preview window switches into multi-screen mode. Each screen is called a "Take". The active take is enclosed with a coloured border.

Step #7 : Edit Video by Choosing Takes
Play the video on the timeline. Watch all the small screens in action in the Video Preview Window. Look out for a good take. Choose the good take by clicking on it. When you choose a take, Vegas Pro automatically cuts the video clip.

Step #8 : Turn Off Multicamera Edit and Fine Tune
When you have completed your multicamera editing, turn off multicamera editing mode. Select Tools > Multicamera > Uncheck "Enable Multicamera Editing".

When multicamera mode is off, the Video Preview Window goes back to one clip. The video tracks remain as one track with the segments neatly cut and joint. Now continue to edit the finer points using the traditional Sony Vegas Video Editing features.
Step #9 : Always Remember to SAVE Your Work

At first the Multicamera edit process seems tedious, but with practice, everthing is easy. I would say the Multicamera Edit feature proves to be the best upgrade since Sony Vegas 4.
Thanks for watching! :)
Adrian Lee
http://videolane.com/
http://videolane.blip.tv/
http://instantviralvideo.com/
http://adriansjournal.blogspot.com/
PS:
Is this tutorial helpful? Do you need to know more?
Please leave a comment or question.
PPS:
Are you thinking of creating your own product, especially a video product?
There has never been a better time to produce and sell your own videos. The market for DVDs is expected to reach $49 billion by 2010 and this doesn’t even include the explosion of web video.
I recommend this resourceful book.
Secrets of Producing and Selling Successful Videos!
This book will help you bootstrap your own video publishing business without investors or loans.
- Discover how others with no equipment or video experience have published successful videos series, not just single videos.
- But if you are a video producer, you’ll discover that special interest videos are a perfect sideline that can overcome the limitations of the video service business.
- Unlike the production business, the special interest video business lets you multiply your profits and sell products around the world from the comfort of your home.
- The Internet gives you amazing leverage. For pennies a day you can have your own storefront that sells your line of videos 24/7.
- Or you can have others do it all for you and send you monthly checks.
- Learn how to choose a profitable genre and find a devoted audience for your video — a skill that can make or break your video business before you even start.
- See how a smart publicity campaign can get your video reviewed in all the right places. Just one good review can bring in $100,000s in sales.
Don’t re-invent the wheel. Discover the proven business models for publishing successful videos.
Get the Secrets of Producing and Selling Successful Videos!
I've searched to find a simple explanation of multicamera and this is the best yet. Thanks.
ReplyDeleteVery nicely done. I was all set to go with Final Cut, but now I'm not so sure. Is Vegas really bullet proof? I would love to edit multi-cam, but absolutely detest crashes. It seems multicam would be the most intuitive and quicker in the long run.
ReplyDeleteReading your tutorial makes more sense than watching tutorial videos on the net which seems too hard for me to understand. Thanks a lot for the multicam... :)
ReplyDeleteGood Multicam comments. You could also observe that it is possible to slide the subsequent edits along the time line if your "live" cut does not turn out as expected.
ReplyDeleteFurther, it sometimes makes sense to add a duplicate of the preferred sound file to the timeline but do not include it in the multi-selection, then the sound remains constant. Hope that makes sense!
Bravo! that was the best tutorial of multicam i ever seen on the internet! Thanks so much!
ReplyDeleteNice job thank you!
ReplyDeleteThis was a good tutorial but my problem is geting the preview screen to the quad viewing mode. My screen just stays one big scren with the color around it.
ReplyDeleteDale. The quad screen will appear only after step #6. Or at least that's how it works on my system.
ReplyDeleteThank you for the brief tutorial. It was helpful and saved me a lot of time...Very much appreciated.
ReplyDeleteThanks for the tutorial. Can you do more tutorial on Sony Vegas?
ReplyDeleteI sat here reading Sony's "help" contents menu for Multi-camera editing for more than two hours and only got as far as the preview screen displaying only one track image, but it did display the "Cam 1" text tag designation on the preview screen. After reading your post, I was able to set it all up on Vegas 8 in less than two minutes! Many thanks for your help! Who writes these company "help" contents screens, anyway? They are completely worthless and defy any sort of logic in their supposedly setp-by-step explanations. Again, many thanks. Keep the tutorials coming! - Don
ReplyDeletecan u do a tutorial on Vegas pro 9. thnx that will relay helps.
ReplyDeleteGREAT help, thanks!
ReplyDeleteCheers very helpful mate
ReplyDeleteWhen I pause my multicamera track, one of the 3 tracks has the blue outline. When I play the outline disappears. Therefore I can't edit on the fly. I can pause, select a different take and it edits. I can pause, ctrl select a different take and it edits with crossfade. What am I doing wrong?
ReplyDeleteThank you so much!
ReplyDeleteThis tut was amazing.
ohhhhhhhhhhh
ReplyDeleteWish i read this a long time ago!!! thank you.
ReplyDeleteHi! I'm not sure how old this post is, but I came across it while looking for information on how to do multi-cam video editing in Vegas 8. It works like a charm, but I noticed that Vegas simply cuts from one clip to the next by default with no transition. If I want to have a blending/fading of one take into the next, is that possible?
ReplyDeleteThanks,
Mario
@brightmonkey Not sure how old YOUR post is, but you'll need to adjust the cut. You can drag the clips to overlap or drop transitions on the cuts, that should accomplish what you need.
ReplyDeleteThank you so much! I've been struggling with this for ages! Much appreciated...
ReplyDeleteVery good man, thank you
ReplyDeleteWhen rendering the clips come out in multi clips insted of one file How Do I Get one file from multi clip in vegas pro10???
ReplyDeleteBig thanks from Lithuania..... :)
ReplyDeleteThanks from Lithuania :)
ReplyDeleteThis really helps, thanks
ReplyDeleteYou Nailed it! I have had this program for years and you brought it home so easily! My life is better! (IF it would not render all night...!) Good job!
ReplyDeleteI read the S8 Help thingy and it did not get me close. You.in 5 minutes!