Posts

Showing posts from June, 2014

How to Remove Eye Bags and Dark Circles in After Effects Using Motion Tracking and Rotoscoping

Image
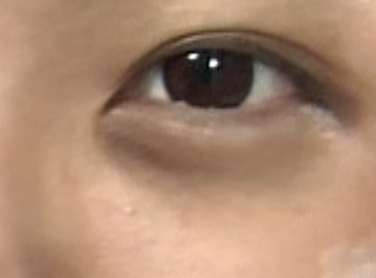
Drag video clip with eye bags and dark circles to the new composition button to create a new composition. Double-click the clip layer on the timeline. Press H to activate the Hand tool. Position the image in the monitor, so we can see the eyes well. Motion Tracking… Go to the main menu, and select Window > Tracker to open the Tracker panel. In the timeline, drag the playhead to the start of the clip. Inside Tracker panel, click Track Motion button. Inside the preview monitor, drag the track point to the eye. Expand the outer box (search region) to the whole eye and eye bag. Expand the inner box (feature region) to include all of the eye pupil. The plus in the centre is the Attach point. Inside the tracker panel, click the play button (analyse forward). Observe and wait for the analysis progress. Go to main menu, and select Layer > Solid to create an adjustment layer. In the Solid Settings window, make a white solid layer about 200x200 px. Click OK. In the Trac

Tribute to a 55 Year Old Coffee Shop on Armenian Street

Hock Hiap Leong pays tribute to this a 55-year old coffee shop on Armenian Street that has been an incessant inspiration to many people. The urban re-development board’s demolishing plans in 2001 inspired the filmmaker to capture this epitaph of history.   Dir: Royston Tan / Singapore / 2002.

Final Cut Pro X Introduces New Features and Enhancements in Version 10.1.2

Image
When opening a project in FCPx today, I was asked to upgrade it to a current version.  This project was done only 2 weeks ago. That means FCPx must have automatically upgraded itself.  Upon checking out the Help menu, I found that my FCPx is now version 10.1.2.  Here are the new features and enhancements. Media Management   Store optimised, proxy, and rendered media outside the library, at the location you choose.  That means I can store the temporary files in a folder and easily delete that whole folder after the project.  (+1 point) Can also easily delete optimised, proxy, and render files from within Final Cut Pro. This was the feature on my wish list. (+ 1 point) View and set storage locations for media, cache files, and library backup files using the Library Properties inspector. I got used to the automatic storage location setting. So, there is nothing to celebrate about this feature. Set storage location Organisation You now have the option to show only unuse

Exploring the BlackMagic Pocket Cinema Camera

Image
Size of an iPhone 5 except not the same thickness. Stealthy size is great for guerrilla filmmakers. +ve Media and battery compartment is at the bottom. Not a convenient place if using tripod or rig. -ve 22 minutes of shooting fills 32 GB of memory. -ve Battery time is up to 1 hour or less if using powered lenses. -ve Recommended reliable SD memory card is Sandisk SDHC U1 Class 10. Includes Mic input and headphones output. +ve No recording time left indicator. -ve Clear focus peaking indicator for accurate manual focusing.  +ve Autofocus mode is very slow.  -ve Require a separate ND filter when shooting outdoors.  -ve Same on-screen interface as the big BlackMagic bigger cinema cameras. No touch screen controls. Must press physical arrow buttons. -ve Records in CinemaDNG RAW or Apple ProRes 422 (HQ) format. Full HD 1920x1080, 220 Mbps. Super 16mm Sized Image Sensor. Rating 3+ve 7-ve. http://www.youtube.com/watch?v=CUWSgmQ4M04

How to Reduce Facial Pores in Adobe After Effects

Image
Drag the video clip with facial pores onto the timeline. Click on the clip’s name in the timeline to select it. Go to the main menu and select Duplicate. Observe a duplicated clip layer below the original in the timeline. Go to the main menu and select Layer > New > Adjustment Layer. Observe a new Adjustment layer appearing on top in the timeline. Click and drag the Adjustment layer name then drop it between the original clip and the duplicated clip layers. Click on the original clip layer name to select it. Go to the Effects and Presets panel and search for Threshold. Click and drag CC Threshold then drop it on to the original clip in the timeline. Observe the image in the preview monitor turning black and white. Go to the Effects Control panel > CC Threshold. Select CC Threshold > Channel > Saturation. Adjust CC Threshold > Threshold down to a value (40 to 60) where the whites in the preview monitor covers the skin of the face.  Go to the Effects and

How to Put Aweber Form into Wordpress Post with Visual Editor

The search is over. A plugin for Aweber form. Almost gave up using Aweber. Coz Wordpress kept deleting the Aweber script. I have to re-insert the script every time I re-edit a post. Tried all the Wordpress plugins for Aweber. None of them worked the way I wanted them to. Either they allow only 1 list or they insert the form to every post. What I want is to insert forms to specific posts. I also want to insert the form anywhere in the post. Then the solution came along. It has nothing to do with Aweber. The plugin did not even mention Aweber in the description. Thanks to this informative interview video... http://itarsenal.com/aweber-javascript-work-move-web-hosts-ejunkie-put-footer-post-travis-sherry-extra-pack-peanuts-video/ The answer is to use Shortcoder... https://wordpress.org/plugins/shortcoder/ Problem solved! Do you have any other solutions? Adrian Lee http://adriansjournal.blogspot.sg

#Running with My New Blue Shoes

Image
Finally, a pair of proper running shoes. The Adidas Lite Pacer . Indeed, it's very light weight. The coverings are as thin as nylon nets. The soles are like spongy Styrofoams. Nearly bought the luminous green pair. Phoebe convinced me to get the blue one. Coz it can double up as casual outing wear. So I broke my previous record again. 4.28km in 33 minutes and feeling great. Adrian Lee

Spartan Wars iPhone Game App Review

Image
First impression? Just another build something on a grid and gain points type of FarmVille style game. This time, the setting is in the Sparta era. Very serious tone.  Second point? The tutorial is too long. There is too much to learn. Too much to read. Midway through the tutorial and I still don't know my objectives.  Skip the tutorial and I don't know what to do next.  Consolation point? The sound effects and music are epic movie type.  What could be better? 3 points. Shorter load time,  voice over instead of text and keep the objective of the game obvious and simple.  Adrian Lee Adriansjournal.blogspot.sg PS: This is only my opinion. The app claims to be the top 10 in 20 countries. If you like to build cities of epic proportion, recruit an army of soldiers and join forces with other players, then this game is for you... https://itunes.apple.com/sg/app/spartan-wars-elite-edition/id581641031?mt=8

How to Remove Pimples in Adobe After Effects

Image
Place the video clip with the pimple on the timeline. In the toolbar, click the Clone Stamp Tool. Observe new panels opening for Brush and Paint. In the timeline, double-click on the video layer. Observe a brush appearing in the preview panel. Change the size of the brush by holding ctrl/cmd key and drag your cursor. Make it double the size of the pimple. If you want to control the soft edge of the brush, let go of the ctrl/cmd key first. Hold the alt/option key and move cursor to an area of skin without pimple. Click once to clone the skin target area. Move the cursor over the pimple. Click once to place the cloned skin over the pimple. If the pixels or colour or brightness do not match, undo and repeat steps 8 to 9 to clone another area. Playback the clip to make sure the pimple is covered up.  If the subject moves and reveals the pimple, animate keyframes as follows. In the timeline, expand the video clip to reveal  Paint > Clone # > Path. Click the Path anima

How to Motion Track Text in Adobe After Effects

Image
Drag video clip into timeline. Go to main menu and select Window > Tracker Controls. Observe a Tracker Controls panel appearing. Go to main menu and select  Layer > Null Object. Select clip in timeline and click Track Motion button in Tracker Controls panel. Observe a tracker box appearing in the preview window. Position the Tracker box on an easily recognisable good-contrast object. Click Edit Target button in the Tracker Controls panel. Select the Null layer and press OK Click the "play-like" button called Analyze Forward in the Tracker Controls panel. Observe the preview monitor playing and analysing. It will take some time. After analysing, click Apply in the Tracker Controls panel.  Select X and Y and click OK. Observe a lot of keyframes generated in the preview monitor. In the timeline, expand the null layer and select all the keyframes. Press keyboard F9 to turn the keyframes into easy ease keyframes. Add a text layer, type in your text and modi

According to my design, you must build 2 more levels - #tinydeathstar

Image
My lunch break mission is to build two more levels. It is going to take me two weeks.  Need to earn enough credits.  Oh well, back to work then. Adrian Lee Adriansjournal.blogspot.sg

Optical Illusion Music Video - The Writing's On the Wall

The horizontal dripping pink paint got me. I thought the stretching pink lines were graphics. Then the camera rotated back to normal. I like the way they reveal the actual setups. Question: Did they really shoot this in one take? Leave your answer below... The Official Video by OK Go - The Writing's On the Wall... Adrian Lee VideoLane.com

How to Fit a Sennheiser onto a Sony Camcorder

Image
Sony camcorders do not have standard sized accessory hot shoe. So here is how I fit, or rather hook my Sennheiser receiver onto the camcorder. Using its metal clip, hang it tight on the hand strap (see image). I do the same for my bigger pro cameras, because the hot shoe is usually used up by the video light. Adrian Lee VideoLane.com

Uploaded a video…

Image
Adrian Video Image has posted a new item, ' Uploaded a video… ' Uploaded a video… How to Freeze Frame with Hold Segment in Final Cut Pro X v10.1.1 – FCPx ep.2 http://www.youtube.com http://VideoLane.com&#8230 ; In the previous video, I showed you how to create a freeze frame using the traditional method, which generates a new image clip in the Timeline. What if you don’t want to generate a new clip, but want to freeze frame within the original clip. In this video, you will discover another freeze frame method that is more fun… facebook.com You may view the latest post at http://adrianvideoimage.com/2014/06/uploaded-a-video/

How to Freeze Frame with Hold Segment in Final Cut Pro X v10.1.1 - FCPx ...