How to Fix a Leaky Tap at Home in 15 Minutes


I am a handy Daddy for the day...  A D-I-Y plumber.  The kitchen sink tap had been leaking for a month.  Did not have time to fix it till today.  I thought it was going to be a chore and considered hiring a professional plumber. However being in a good mood today, I decided to do it myself... with the help of wife and two kids. Everything was done in 15 minutes.

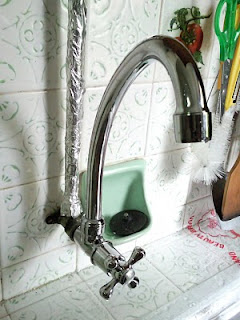
1. Took a picture of leaky tap with my Samsung Omnia 2.
A picture paints a thousand words. So taking a picture is easier than explaining what type of tap we need. The Samsung Omnia 2 came in handy for such purpose.

2. Walked to the hardware shop downstairs to show the picture.
The hardware shop is conveniently located a few steps from our home.  The decision was quick. There wasn't much choice of models to select except one.

3. Bought a similar tap at S$22.
Wife asked if they have the old kind of tap that last longer.  They said they don't make such a thing anymore.  Add S$30 if we hire their plumber to fix.

4. Turned off main water supply to the house with a spanner.
The main water tap to the house was located on the ground floor... accessible to the public!  There were four, each leading to a different household... and there were no markings nor labels.  With the help of my younger kid, we shut off the wrong mains.  If anyone in that household was showering, I am sorry.  The next tap we shut was ours.

5. Unscrewed the old leaky tap from wall pipe.
This was easy, though the kids were impressed.   The kids are easily impressed when hero daddy does extraordinary stuff.

6. Applied white tape on new tap joint.
This was my idea.  We had some white tape and it will be a good idea to use it at the joint to ensure a tight fit.  This was not my first time fixing a tap anyway.

7. Screwed on the new tap with a little force.
As always, taps never align properly after screwing it completely.  Had to use a spanner to force the joint a little more to make a perfect alignment.

8. Turned on main water supply.
In the spirit of trying new things, my younger kid insisted that she open the tap.  I guided her tiny hands as she handled the heavy-weight spanner.

9. Modified the thimble for better water flow.
This was wife's idea.  The new tap seem to have a weak water flow pressure. So wife removed the thimble from the tip of the tap, poked bigger holes on it and walla! Done.

When you have a leaky tap (faucet) to fix, don't call me.  Do it yourself. It's easy.  Impress your kids, your wife and yourself.

Happy weekend!
Adrian Lee
http://twitter.com/AdrianLee ... <--- follow me.

Reblog this post [with Zemanta]

Comments

Popular posts from this blog

Macbook Air M1 Case

I bought a transparent case for my MacBook Air M1 . It came with a free screen protector, a keyboard cover, and some rubber plugs to cover the ports. Check it out! https://youtu.be/d-wALSd3nn8 I didn't expect the rubber plugs. It was a nice surprise. The case fits snuggly, with access to all the ports. The keyboard cover is almost invisible to the eye. I have no intention to use the screen protector. Why? I need to see the true color of the display for my YouTube videos. ~ Adrian Lee  @Adrian Video Image  The video was recorded on iPhone 12 Pro Max with Filmic Pro app in 4K 60fps and edited with Capcut.

Sony Vegas Pro 8 Tutorial - Multicamera Editing

Sony Vegas Pro 8 makes it easier to edit videos from different cameras right from the timeline. You can capture and edit video for a single scene from 2 or more cameras or for a single scene shot a few times with one camera. Here is a tutorial of a Multicamera Edit of a drama I shot. The drama was acted out four times to the public and being a non-profit organization, the client have budget only for one videographer. For each of the 4 acts, the camcorder (Sony HDR-FX7 High Definition Camcorder) was placed at 4 different positions and shot in various angles. Multicamera edit is accomplished in only 8 steps with the Sony Vegas Pro 8. Step #1: Capture Multicamera Video Clips Use the normal Sony Vegas Video Capture function to capture recordings from each camera. Give each capture filename a unique name. Enable scene detection before capturing so that each segment is captured as a separate clip. Step #2 : Layout Video Clips on Timeline Drag and drop video clips over each other on the...

How to Connect an External Video Camera to MacBook Pro for Live Streaming

How to use an external camera on Mac? In this video, I demonstrate how I connect my GoPro (or other cameras) to my Macbook Pro for live streaming? See the links below the video for the list of equipment required for the setup.  Links... - Micro-HDMI to HDMI cable... https://amzn.to/2VnZNcC - HDMI to USB Capture Device...   Elgato Cam Link 4K... https://amzn.to/3a0Gcob   Alternatives...   Ansten... https://amzn.to/2W4mzGM   Unisheen... https://amzn.to/2y9BDKS   Magewell... https://amzn.to/3b2StJX   ATEM Mini... https://amzn.to/2RtsDam   Treaslin... https://amzn.to/2YidpHJ - USB to USB cable... https://amzn.to/2VnhpVX (Not required for Elgato Cam Link / USB to USB-C required for New MacBook pro) - GoPro Hero7 Black... https://amzn.to/3a8oiA9 - Gekkopod Flexible Tripod Stand... https://amzn.to/2yOyosF Like this video? Buy me coffee... 😋 https://www.buymeacoffee.com/VideoLane